
As the costume/prop maker/director on Phantom Moose, I was called upon to create the blood-chilling monster needed for the cave sequence in iSundae. Here is my experience for you to enjoy.
When faced with building a monster head there are three basic approaches:
- Plan everything out ahead of time.
- Dive right in, write nothing down, and go through piles of material with each revision.
- Knock out a rough idea and start cutting cardboard.
For those of us who have never made a monster before, approach number one seems simple, but how can we plan it if we don’t know what we’re doing? Approach number two lends itself well if time, budget, and materials don’t matter. In our case, they mattered very much, so we used approach number three. It was very easy. Sketch out a quick pencil outline of what you want it to look like, mentally review what needs to be present, take a deep breath, then go hunt up a stack of cardboard.
Cardboard is, in itself, a very useful item, but a basic understanding of how to use it best is a bonus. I could probably write an entire section on cardboard, but for now, I will say to use common sense.
If your monster head is to be large and covered with heavy material(s), use thick, corrugated cardboard, not cereal or tissue box thickness.
I started with two strips of corrugated cardboard at roughly three inches wide. (Unless you need an exactly sized monster head, precision at this stage is optional.) I then bent them into two rings. Cut the cardboard so the corrugation runs across the short way – it’ll bend a lot easier. One ring was about a foot in diameter, and other was six inches in diameter. Don’t worry if they aren’t perfect circles, because they won’t stay that way for long.
 Keeping in mind the basic idea of what this monster had to do, I attached the two rings together with strips of cardboard and added some braces and a hand hold, then I stuck on the horn structures made of big, empty, thread spools.
So far, so good. Then a remembered I needed a moveable lower jaw. Great. Okay, fall back and regroup.
Finally, I had to perform monster surgery. I cut the snout ring into halves and I cut off the bottom of the skull ring, then I built the jaw out of more cardboard and attached it with brads. Much better.
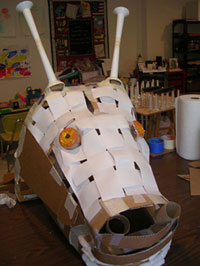 Next, I covered the structure with loosely woven scratch-paper strips. This gave me something to hold up the monster skin and attach it to. In an attempt to keep the monster head from looking flat, I masking taped/hot glue-gunned packing peanuts in strategic places to give the under-the-skin illusion of muscle, or just plain ol’ shape. Since I didn’t know much about the muscular anatomy of monsters, I just free-styled. It worked pretty good. (We’ll get to the eyes in a minute.)
Then I was ready to start the cosmetic side of things. I made a mistake. Let me give you a warning: When you make a monster head, do the inside mouth lining first. Then you can reach and see it without having to literally stick your head in the monster’s mouth.
Another interesting aspect was that when we suspended the monster’s upper jaw from the ceiling (so it would stay open), the plug-in for the hot glue gun was just far enough away that it didn’t reach. I had to unplug, glue as fast as I could, plug in, then wait…
Anyway, I attached the eyes first. They’re baby food jars that I painted with an odd mix of glass paint and acrylic. Hey, it worked. We used glass because we hoped to shine lights up in them and make them glow. That’s a whole ‘nother story.
Then I moved onto something simpler. I made the ears. Cardboard cut-out shapes, packing peanuts where I wanted some beef, and three kinds of fabric.
For this monster, we used a green, textured, velvet type fabric thingy. It was rather expensive. ($20 a yard. Ouch.) We used 2 to 3 yards, but we got the fabric on sale. (Thankfully.) We also used some reddish fur and muslin which I painted pink. The trick with the fur was hiding the straight cut edge so it looked a little more natural. I had to glue little chunks of fur-fuzz.
Beware: fur sheds, the fabric fuzzes and, when painting muslin, have paper towels handy. Also, hot glue is hot! (Can you believe it?) Always look before you stick your hand into the depths of the monster’s mouth, holding a piece of fabric between two fingers, aiming for a glob of hot glue of uncertain locality.
When I put the skin on his face, I started in the middle and worked my way out. It helped quite a bit. If I did something to one side, I did it to the other. For the most part, it made things simpler.
Once the skin was on, Priority Mail (so named because of the source of most of the cardboard boxes) had a very wide-eyed innocent look. Non-scary, to say the least. Big round eyes tend to do that. So I cut almond shaped pieces of thin cardboard, (now is when you use the empty cereal or tissue boxes) covered them with the green fabric and glued them around the eyes. Voila! Instant menace. Priority Mail was so scary that when my younger sister walked in, she thought it was a green cow! (Sigh.)
Now we move on to the other business end, namely the mouth and teeth. As I said before, do the mouth first. I had to fold and glue and snip and cut and trim and stretch and paint and, you get the idea. I couldn’t see very well. I did think to leave the front end loose and unglued so we could glue in the teeth without much trouble.
 The teeth are Model Magic. About a package worth. Once they were shaped and dry, we glued them in. Wow, just look at those pearly, white teeth! You know something’s wrong when your monster has whiter teeth than you. So Ruth “glazed” them for me with a thin yellow paint and added lovely, charming blood streaks. Gross, but effective.
The tongue was easy. A cardboard cut-out shape and some of the red fur glued furry-side down. If you’ll notice, we even put in an epiglottis.

You can see he’s coming together nicely.

 The head was done, but a head by itself isn’t all that impressive, and it’s very difficult to choreograph a fight scene when the attacker is only a head. So we made claws. A tube of muslin inside a larger tube of the green fabric, the gap filled with packing peanuts, claws made like the teeth, and a little red fuzz for sprouting between the toes. Oh, and some cardboard support at the claw end so they don’t curl up on themselves.
We were ready for one cool monster fight!

The possibilities and options are endless. Paper maché, feathers, tennis shoe soles (hmm), rubber, carpet (old throw-away, not off the floor), and whatever else you can think of. I would not recommend anything that’s alive and wiggling, or pink feather boas. It’s all up to you.
—–
When it came time to film with Priority Mail, the eyes worked great. For the first take. Then the LEDs shorted out.
In the middle of filming, I realized that making a body would have helped a ton, but it was too late. And I didn’t want to mess with it.

At the moment, Priority Mail is quietly resting upstairs on a shelf, with a tissue box in his mouth to make sure his weight doesn’t snap off his teeth. He was a one time deal. I don’t know whether we’ll use him again, but he’s still there, and I’m not going to throw him away. Maybe someday he’ll be famous and worth a ton of money. Who knows? I had a lot of fun (and difficulties) making him, and I wish you luck with your monsters!
Rebekah!! Oh my goodness gracious. That is amazing. Wow! I would never have that much creativity/patience for that. See ya Sunday!
WoW!The moose looks so realistic!
Fantastical!!! Very, very, VERY spiffy. VERY spiffy. Very. Spiffy.
-Director-To-Be